
Nominate A Validator (TestNet)
How to back testnet validators with your AGLS, claim your share of their rewards, and stop.
How nominating works on Quip
- Nominating needs no node and no approval. You bond AGLS (the testnet token) from your account, which becomes your stash, and choose up to 16 validators to back. Your stake counts toward theirs in each validator election.
- Only validators approved by the Quip Foundation can be elected. A nomination for a validator that isn’t approved counts for nothing until it is approved.
- Sessions last 1 hour and an era is 6 sessions (6 hours). A new nomination counts from the next era (see When your nomination counts).
- Every era, each active validator earns AGLS rewards. The validator first keeps its commission. The rest is shared between the validator and its nominators in proportion to their stake. Rewards are paid only when someone claims them (see Claim your rewards).
- If a validator you back is slashed for signing twice, its nominators for that era lose the same share of the stake they put behind it. The slash is applied 28 eras (about 7 days) after the offence. Back validators you trust to run their node carefully.
- Unbonded AGLS stays locked for 28 eras (about 7 days) before you can withdraw it.
What you need
- A web browser for the Polkadot.js portal (portal.aglais.quip.network).
- A Quip account: a recovery phrase that the portal imports with From Quip mnemonic. Step 1 makes one with the node software, which needs Docker.
- At least 6 AGLS: 5 to bond (the current minimum nominator bond) and 1 for fees. One request to the faucet gives you 10.
Step 1: Create and fund your account
Follow Step 1 of Run A Validator: generate a recovery phrase with the node software, import it in the portal with Accounts → From Quip mnemonic, and request AGLS from the faucet for the address the portal shows. That account is your stash.
Step 2: Choose validators
- Open Network → Staking → Overview. With Active selected, the list shows the active validators. For each one it shows its era points so far this era (the number in the badge), the stake of its nominators (other stake) and its commission. The arrow at the end of a row shows its own stake.
- Note the addresses of the validators you want to back. The next step lists validators by address only, and it also lists validators under Waiting, which may never be elected.
Prefer validators that stay online: validators earn era points by producing blocks, and rewards follow era points. A lower commission leaves more of each reward for nominators.
Step 3: Bond and nominate
In the portal, open Network → Staking → Accounts and choose + Nominator.
-
Setup Nominator 1/2: pick your stash. Replace the value bonded with at least 5, and keep at least 1 AGLS unbonded, because later steps such as Stop and Unbond each cost a small fee that bonded funds cannot pay. For the payment destination, Stash account (increase the amount at stake) adds your rewards to your bond, and Stash account (do not increase the amount at stake) keeps them free to spend. The on-chain bonding duration shows 7 days: that is how long funds stay locked after you unbond. Choose next.
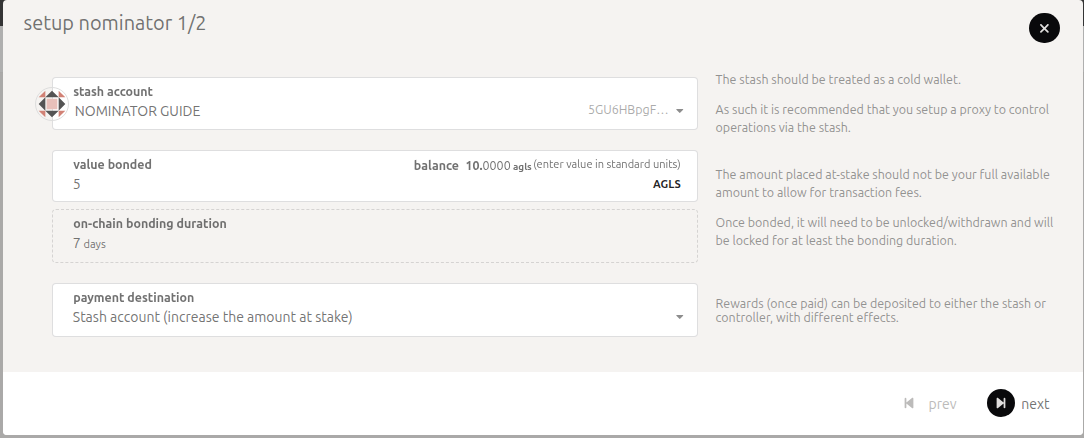
The portal may warn that the bonded amount is less than the current active minimum nominated amount. You can still continue. An election counts at most 64 backers per validator, largest stake first, and today every nominator fits.
-
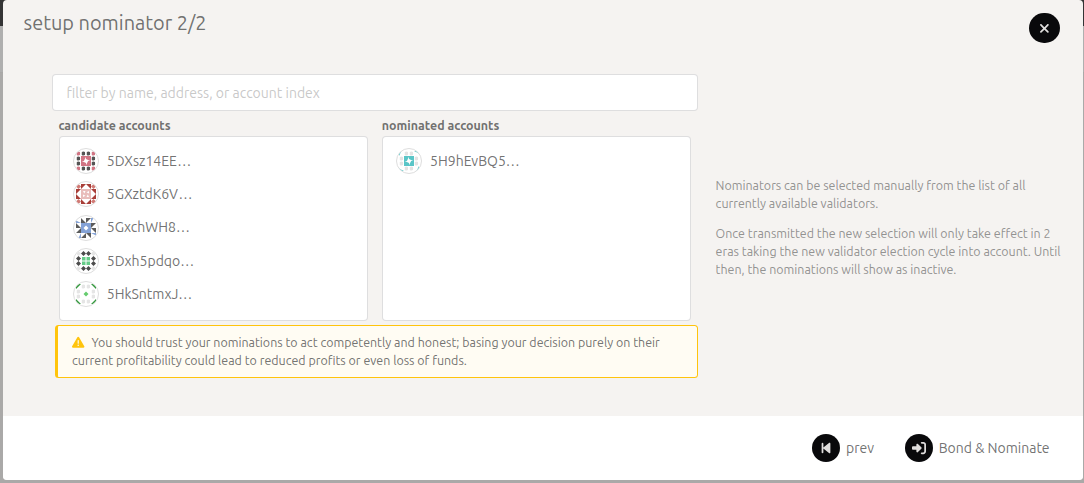
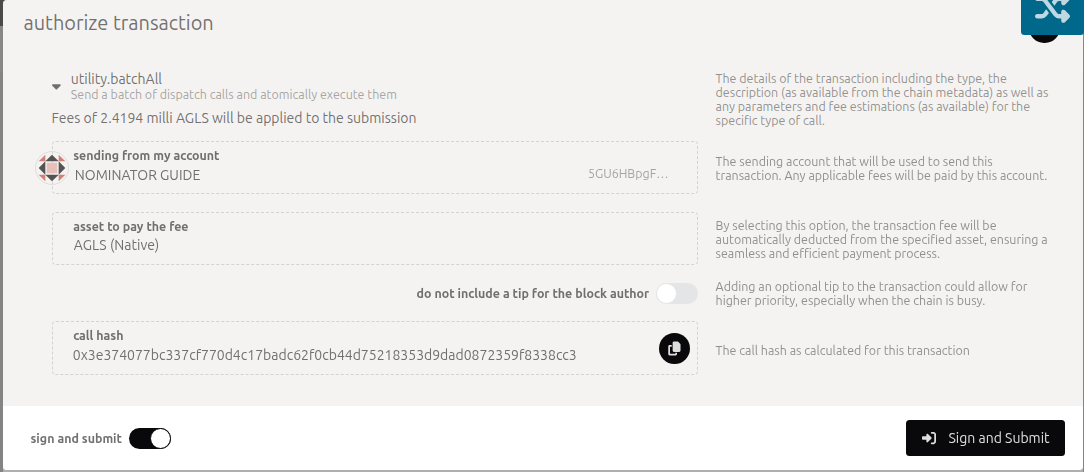
Setup Nominator 2/2: under candidate accounts, choose the validators you noted in Step 2. Each one moves to nominated accounts. You can pick up to 16. Then choose Bond & Nominate and sign with your stash.
-
The portal confirms with a green utility.batchAll notice and a list of events that includes staking.Bonded and utility.BatchCompleted. Your stash shows its bond and Stop on Staking → Accounts.
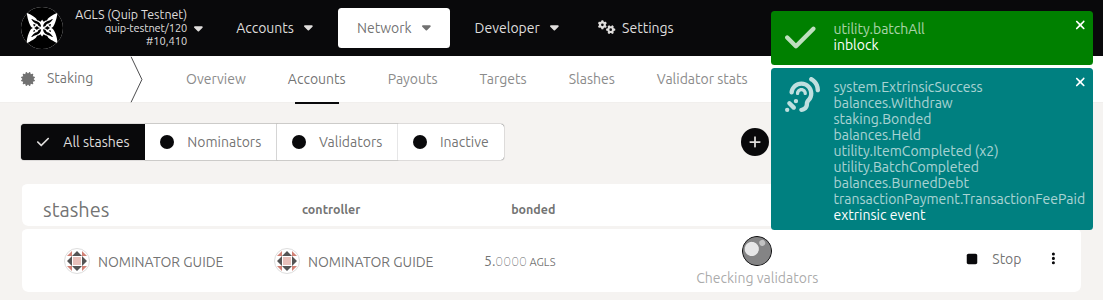
Until your nomination counts, the stash row may show Checking validators instead of the validators you chose. That is a display gap in the portal, not a problem with your nomination. Once it counts, the row shows Active nominations with the number of your validators that are active.
When your nomination counts
The validators for the next era are elected during the last session (the last hour) of the current era. A nomination sent before then takes part in that election and counts from the next era. A nomination sent during the last hour counts from the era after that, up to about 7 hours later. The portal’s note “will only take effect in 2 eras” describes that later case.
For example, a nomination sent early in era 3 counts from era 4, and its era-4 rewards can be claimed once era 5 starts.
To check your nomination, open Developer → Chain state, choose staking and nominators, pick your stash and choose +. It shows the validators you chose as targets and the era you sent it in as submittedIn. Developer → Chain state → staking → activeEra shows the current era.
Claim your rewards
Each era’s rewards can be claimed once the era has ended, and for 84 eras (21 days) after that. Older rewards can no longer be claimed.
- Open Network → Staking → Payouts. With your stash imported, it lists the eras with unclaimed rewards from the validators you backed, your share of them and the time left to claim. It shows the last 2 days at first: choose 6 days, 18 days or Max, 84 eras to see older eras.
- Choose Payout all and sign. Any account can send the claim and pay its small fee, and one claim pays the validator and all of its nominators for that era. If the validator or another nominator has already claimed an era, it no longer appears.
If Payouts doesn’t list an era you expect, claim it in Developer → Extrinsics: choose staking and payoutStakers, set validatorStash to the validator’s stash (not yours) and era to the era’s number, then choose Submit Transaction and sign.
The rewards go to the payment destination you chose in Step 3. Change reward destination in your stash’s menu (⋮) on Staking → Accounts changes it for later claims.
Change your nominations
- To back other validators, open your stash’s menu (⋮) on Staking → Accounts and choose Set nominees. The new list replaces the old one and counts from the next election, as in When your nomination counts.
- To add to your stake, choose Bond more funds in the same menu.
Stop nominating
- On Network → Staking → Accounts, choose Stop on your stash. Your nominations end at the next election, and your AGLS stays bonded.
- From your stash’s menu (⋮) choose Unbond funds and enter the amount. Stop first: while you are still nominating, an unbond must leave at least 5 AGLS bonded.
- The funds unlock after 28 eras (about 7 days). Then choose Withdraw unbonded funds from the menu.
Unbonding, rebonding and withdrawing work the same way as for validators, with the same dialogs: see Leaving in Run A Validator. To nominate again after Stop, choose Nominate on your stash.
Known portal limitations
- Imported accounts are lost when you reload or close the page. The Import and Export buttons do not take Quip phrases.
- The validator lists show addresses, not names: the testnet has no on-chain identities.
- The stash row can show Checking validators for a long time while none of your validators has an active nominator.
- The testnet has no separate controller account: your stash signs every step, and Change controller account stays grayed out.
- More portal notes are in Run A Validator.
Where to go next
- Run A Validator (TestNet) covers the validator side: running a node, getting approved and claiming for a whole validator.
- Participants describes the nominator role in the planned network design.
- aglais.quip.network publishes the current testnet endpoints.
Run A Validator (TestNet)
Join the Quip Network testnet as a validator: create a stash account, run a validator node, register its session keys, and get approved by the Quip Foundation.
Miners
The two families of mining hardware: classical platforms (CPUs, GPUs, TPUs, NPUs) and quantum platforms supporting entanglement.